Buy Yamaha Outboard Parts

Announcement

Collapse
No announcement yet.

Speedi Sleeve-Where do you get them, how to install them?

Collapse
X
 
  • Filter
  • Time
  • Show
Clear All
new posts

  • Speedi Sleeve-Where do you get them, how to install them?

    Originally posted by rodbolt17 View Post
    I have done many sleeves, some 3 or 4 times.
    typically we see 600-800 hours between sleeve replacements.
    I use locktite 518 on the sleeve ID to prevent leakage between the shaft and the sleeve.
    no mystery in the pump itself only issue we ever have with sealing the pump is getting the screws out.
    Looking to get some positive input on these Speedi-Sleeve kits for members that may need them.

    Where do you get these kits? How do you select proper kit? What are the instructions to install them properly? do you use one with a "flare" at one end, or do you use a "straight" one?

    Does Yamaha sell these kits or not? If so, is the kit made for a particular model (Crankshaft diameter where meets oil pump seal)? Or is it recommended you measure the diameter in several axes to select proper size sleeve?

    If not sold by Yamaha, I would think by bearing/seal supplier, are we talking about SKF brand, or is there another brand? Apparently these were made by a company, CR Seals, and SKF bought them out. There is a "****" line, would they be worth extra cost?

    Here are some links on these:

    http://www.skf.com/binary/26-128020/...edi-Sleeve.pdf

    http://www2.chicago-rawhide.com/PDF/...lation_50A.pdf
    Chuck,
    1997 Mako 191 w/2001 Yamaha SX150 TXRZ Pushing Her

  • #2
    Originally posted by cpostis View Post
    Looking to get some positive input on these Speedi-Sleeve kits for members that may need them.

    Where do you get these kits? How do you select proper kit? What are the instructions to install them properly? do you use one with a "flare" at one end, or do you use a "straight" one?

    Does Yamaha sell these kits or not? If so, is the kit made for a particular model (Crankshaft diameter where meets oil pump seal)?
    Boscoe can give us a full explanation; but this is what I have seen:

    ALL F150, F200, F225, & F250 MODELS THROUGH 3/31/2008 PRODUCTION

    A Yamaha-specific repair sleeve has been developed to repair seal wear on the F150, F200, F225 and F250 crankshafts. These models utilize an oil pump that is driven by the lower end of the crankshaft. Oil leakage is con*****ed by a double-lip oil seal in the oil pump housing. Seal wear grooves may develop on the crankshaft seal surface due to environmental conditions and usage patterns leading to oil leakage down the driveshaft. To minimize repair time and expense, the Yamaha-specific repair sleeve for this specialized application can be installed on the crankshaft to provide a new seal surface without requiring replacement of the crankshaft.

    P/N: MAR-CRKSL-VE-00

    MAR-CRKSL-VE-00 CRANK REPAIR SLEEVE

    Comment


    • #3
      it is in the Yamaha parts system.
      first one I did I used the SKF chart and modified the sleeve with a grinder.

      not all SKF sleeves need to be modified.

      Comment


      • #4
        If and when using the speedy sleeve repair make sure that the correct oil pump seals are used.

        Later model motors came with a wear sleeve installed. Different oil pump and different seals involved.

        The repair sleeve from Yamaha might include the repair procedure.+

        For your viewing pleasure.

        https://www.youtube.com/watch?v=p1aM0Kb9qc0

        Comment


        • #5
          not all F225 motors were 3.3L
          a Yamaha is not a Yamaha
          if I said I need an oil pump for my 300 HP Yamaha what is the part number ?

          Comment


          • #6
            Originally posted by boscoe99 View Post
            Later model motors came with a wear sleeve installed. Different oil pump and different seals involved.
            Now this "wear sleeve", Yamaha calls it "collar", I can find on Boats.net on 2006 and later models. However on Yamaha's site not until 2008 model years. I am assuming Boats.not is incorrect. Whatever parts are ordered you must always ensure you use your model#, or even better, PID to get the right part. Especially in those 2006 and up model years.

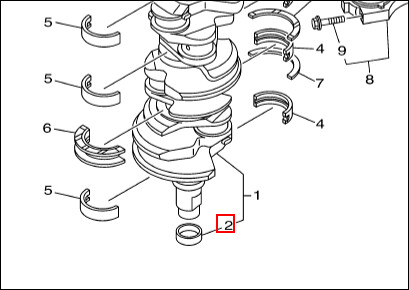
            Rodbolt, others, is this collar a wear item? Have you replaced them? How is it secured to the crankshaft (pressed on, adhered, etc.)? Is it an item you periodically find worn and replace after 600-800 hours like you have done with some speedi-sleeves?

            [IMG]69J-11478-00-00 .Collar by Charles Postis, on Flickr[/IMG]
            Chuck,
            1997 Mako 191 w/2001 Yamaha SX150 TXRZ Pushing Her

            Comment


            • #7
              It is the factory version of the speedy sleeve repair modification. As I recall the factory sleeve is a bit thicker than the speedy sleeve collar which necessitates a different oil seal.

              It indeed is a wear strip or surface.

              If the factory collar were to wear then it can simply be replaced by ordering and installing item number 2.

              The Yam parts book at boats.net has some idiosyncrasies that the Yam parts book at Yams site does not have. Better to use the Yam site and then just plug the part number into the search box at boats.net to order the right part.

              Don't get models coming from the factory with no collar, which can use a speedy sleeve repair, with those that come from the factory with a collar installed. At the Yam parts book at their site it is better still to do a search based on the engine id number. It will take you to the right parts book.
              Last edited by boscoe99; 01-14-2017, 03:26 PM.

              Comment


              • #8
                Originally posted by fairdeal
                although I've read about the Speedi-Sleeve, have not yet had to do it on my F225TXRD.

                what confuses me: the seal is still the same part, before and after?

                I would think, with the OD of the sleeve greater than the original crankshaft,

                that a different size seal would be needed....
                Seals are "forgiving" to a point. Speedi sleeves are thin-walled (0.28 mm) (0.011 in.), negligible to nearly any seal. This is about the thickness of a sheet of 20# general print paper.
                Chuck,
                1997 Mako 191 w/2001 Yamaha SX150 TXRZ Pushing Her

                Comment


                • #9
                  If the collar is thicker than the speedy sleeve, they could have kept the same seal, but turned the crank some to get the ID of the collar smaller to keep the OD the same as the old crank.
                  But that would have meant a change in machining of the crank itself..

                  And I am sure the thicker collar may be easier to install

                  The sleeves I have installed were very thin and expanded when drove onto the shaft they were repairing( no modification of the original surface needed, but used the same original seal)
                  I guess the seals could accommodate the small difference in diameter.

                  Comment


                  • #10
                    I also sleeve the input shafts on mercrusier and Volvo drive shafts occasionally. made a tool for installing them.

                    it is not difficult.

                    I cant remember the exact date of the 4.2 f225.

                    but it has gotten confusing enough that I typically use parts manager pro for late model engines.

                    Comment


                    • #11
                      f225 0409 is 4th month of 2009 which could very well be a 2010 release.
                      this is why it is critical to use the PID when looking up US market parts.

                      Comment


                      • #12
                        Originally posted by 99yam40 View Post
                        If the collar is thicker than the speedy sleeve, they could have kept the same seal, but turned the crank some to get the ID of the collar smaller to keep the OD the same as the old crank.
                        But that would have meant a change in machining of the crank itself..

                        And I am sure the thicker collar may be easier to install

                        The sleeves I have installed were very thin and expanded when drove onto the shaft they were repairing( no modification of the original surface needed, but used the same original seal)
                        I guess the seals could accommodate the small difference in diameter.
                        I believe you are right about the turned down crank. If you were to order the crank, it comes with the collar installed.

                        About installation of the "collar". I would think it needs to be pressed on? Maybe heated to expand and remove?
                        Rodbolt?

                        [IMG]69J-11478-00-00 .Collar by Charles Postis, on Flickr[/IMG]
                        Chuck,
                        1997 Mako 191 w/2001 Yamaha SX150 TXRZ Pushing Her

                        Comment


                        • #13
                          Crank shaft is the same. Only difference is from April 2008 and later the crank shaft comes with a collar installed on the end. A collar that is thicker than the speedy sleeve.

                          Yamaha tells its mechanics all about this stuff.

                          Comment


                          • #14
                            Originally posted by boscoe99 View Post
                            Crank shaft is the same. Only difference is from April 2008 and later the crank shaft comes with a collar installed on the end. A collar that is thicker than the speedy sleeve.

                            Yamaha tells its mechanics all about this stuff.

                            Ha, April Fools Day
                            Last edited by 99yam40; 01-15-2017, 11:08 AM.

                            Comment


                            • #15
                              to remove the sleeves I carefully use a small side grinder and thin it some.
                              then I use a very sharp screwdriver and split it.

                              Comment

                              Working...
                              X