Buy Yamaha Outboard Parts

Announcement

Collapse
No announcement yet.

Leakdown testing questions

Collapse
X
 
  • Filter
  • Time
  • Show
Clear All
new posts

  • Leakdown testing questions

    referring specifically to an F225 w/ ~ 1000 hrs - in apparently "good" running condition

    1. what would be the values (range, I assume) one might expect to see when tested @ 100 psi ?

    2. would the results be expected to vary significantly whether tested with the engine "cold" or "hot" ?

    thank you!

  • #2
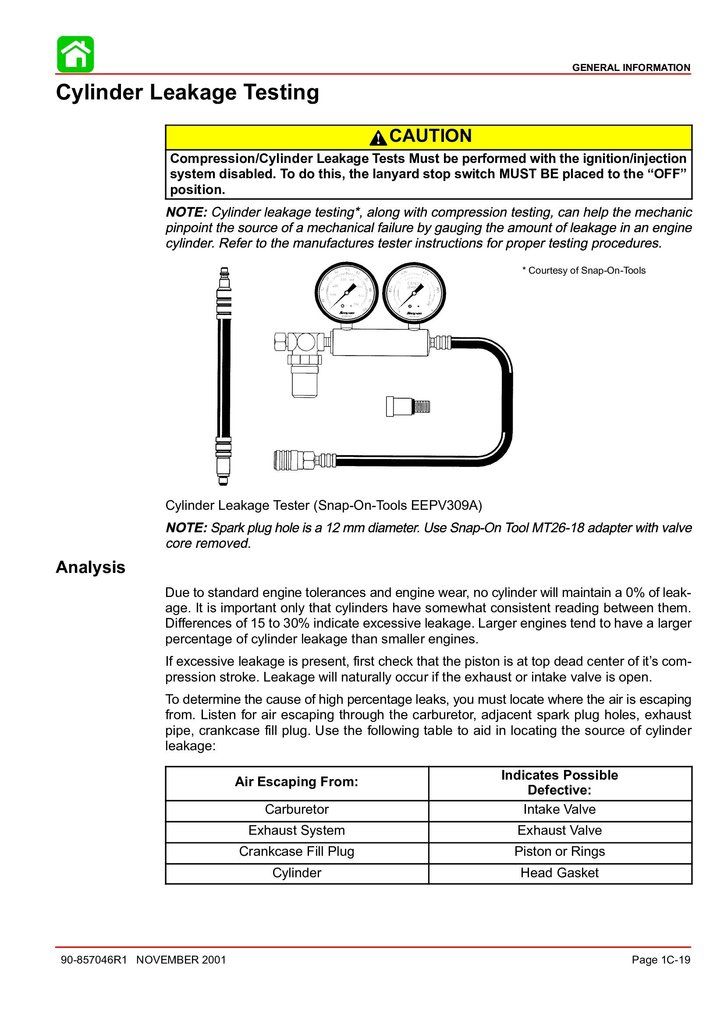
    Removed from a Mercury 30/40 Service Manual


    Must be the same principles for your motor

    Comment


    • #3
      Thank you!
      I'm not seeing >15%, thankfully, nor did I expect that

      I am asking, though, what "in practice" one would expect to find
      on a ten year old motor that's, what, a quarter of the way into its expected hours of life?

      And, if the engine temperature when measured makes a difference to the findings.


      (Mercury does write NICE service manuals, don't they?)

      Comment


      • #4
        all depends of the use, maintenance, etc etc and some luck off course...
        Here are some motors with +/- 10k hours (most 60 enduro, F50 or F60 and F80 or F100. sometimes twins, used on commercial fishing) some with more than that.

        I have a Yamaha F100 that made 75 and 90 4 stroke for Mercury and a Yamaha F40 made by Mercury for Yamaha and I can say that Mercury SM´s are far superior than Yamaha SM's.
        Same motors but Mercury SM's are much more complete/detailed

        For my motors I use both
        Last edited by almetelo; 06-02-2015, 06:57 PM.

        Comment


        • #5
          Wish that Mercury crafted motors like Yamaha and that Yamaha crafted manuals like Mercury. Mercury does produce some fine manuals. Plus, if you find an error you can call them and they may update the manual. You will see revisions from Mercury. I have never seen a revision from Yamaha.

          It can make a difference if the motor is tested hot versus cold. Ideally the test should be performed as quickly as possible after the motor has been run and reached normal operating temperatures. Also, oil will have lubricated the piston, rings and cylinders which affects sealing of the combustion chamber.

          A ten year old motor could have 100 hours time on it or it could have ten thousand hours. Results of a test will obviously vary. Too many variables to say what value any motor should indicate after the passage of time.

          Aviation pressure testers use 80 psi as the reference input pressure but these are big displacement motors. I believe that Yamaha uses less than that. More like 60- 70 I recall. Seems reasonable given the difference in displacement. Maybe Rodbolt knows the exact pressure that is applied to a cylinder via a Yamaha tester.

          Here is a written test procedure as an example of what one engine maker wants done.

          1. Perform the test as soon as possible after the engine is shut down to ensure that the piston rings, cylinder walls, and other engine parts are well lubricated and at operating clearance.
          2. Remove the spark plug from each cylinder. Identify the cylinder number and position of the removed spark plugs. Examination of the spark plugs will aid in diagnosing engine and cylinder conditions. Reference spark plug manufacturers’ technical data.
          3. Turn the crankshaft by hand in the direction of rotation until the piston (in the cylinder being checked) is coming up on its compression stroke.
          4. Install the cylinder adapter in the spark plug hole and connect the differential pressure tester to the adapter. (NOTE: Cylinder pressure valve is in the CLOSED position). Slowly open the cylinder pressure valve and pressurize the cylinder to 20 PSI.
          5. Continue rotating the engine in the normal direction of rotation, against this pressure, until the piston reaches top dead center (TDC). TDC is indicated by a sudden decrease in the force required to turn the crankshaft. If the crankshaft is rotated too far, back up at least one-half revolution and start over again to eliminate the effect of backlash in the valve operating mechanism and to keep the piston rings seated on the piston ring lands.
          WARNING
          Care must be exercised in opening the cylinder pressure valve, since sufficient air pressure will be built up in the cylinder to cause it to rotate the crankshaft if the piston is not at TDC.
          6. With the piston at top dead center, open the cylinder pressure valve completely. Check the regulator pressure gauge and adjust, if necessary, to 80 PSI.
          7. To assure that the piston rings are seated and the piston is square in the cylinder bore, move the crankshaft slightly back and forth with a rocking motion, while applying the regulated pressure of 80 PSI, to obtain the highest indication. Adjust the regulator as necessary to maintain an input pressure gauge reading of 80 PSI.
          8. Record the pressure indication on the cylinder pressure gauge. The difference between this pressure and the pressure shown by the regulator pressure gauge is the amount of leakage through the cylinder.
          Record individual cylinder readings as; (pressure reading)/80 PSI.
          9. Note any leakage source (air discharge) and determine serviceability. Refer to Table 1.
          10. Proceed to the next cylinder and repeat Step 3 through 9 until all cylinders have been checked.
          Last edited by boscoe99; 06-02-2015, 07:12 PM.

          Comment


          • #6
            I have all kinds of revision pages pasted in various Yamaha manuals.
            I am dang glad merc doesn't anganeer sheet for Yamaha.

            however the above posted crapola from merc about larger engines and 0 percent leakage is just that. crapola.

            it freaking seals or it don't.

            don't matter if its your weed whacker or a 24 cyl radial.

            cyl sealing is simply that and that is what the leakdown is measuring.

            and yes I do get some readings that indicate 0%, physically should not happen but I also have a floor joist supporting post in my house that has moved up 1 5/8ths inches against all laws of physics.

            its made a hump in my kitchen.

            in theory that cyl at TDC at compression stroke is a perfectly sealed cyl.
            however there are ring end gaps and such.

            industry standard is 15% leakage is acceptable.
            some allow 20 %.
            anything over 25% is a reason for tear down.

            Comment


            • #7
              Thank you, gentlemen

              A wealth of information, very much appreciated

              I could have been less roundabout in my question, I just did the testing for the first time on this ( or any other) engine,

              with the upstream gauge @ 100 it was holding 97-98 on all six cylinders

              I know there was air flowing, and at one point I forgot to advance to the next TDC and saw it drop to <65, of course a valve was open.

              So very glad that there were no "bad" readings but then wondering if what I was getting was "too good to be true".

              And of course, doing it "cold". I can imagine that thick oil in the piston lands could seal slightly better than thin.....

              Comment


              • #8
                unlike adding a bit of oil for that quick compression stroke.
                a leakdown test will blow off any oil.

                its why a leakdown test is so much more accurate than a compression test.

                that and with a leak down I can not only tell if its pass or fail, I can tell what failed.

                Comment


                • #9
                  Floor joist didn't go up.. the peripheral went down..

                  Comment


                  • #10
                    actually, it freaking DID go up.
                    when the concrete was poured 20+ years ago it left a line on the post.
                    that line is now about 1 5/8ths of an inch above the concrete just on that one post.

                    yep, defies all laws .
                    yep I did hire a structural engineer to come look at it and he came up with the same results.

                    everywhere else in the house the laser level shows 1/4" or less off level.

                    except that one hump.

                    only thing we can think of is a clay soil expanding or organic material under the post.

                    Comment


                    • #11
                      Chain saw could solve that problem.
                      Cut a slice out and then shim it to exact tolerance needed
                      that would beat raising all the others to match

                      I have heard of this heaving before but that was way up north
                      that is strange and only one piling
                      Last edited by 99yam40; 06-03-2015, 08:11 AM.

                      Comment


                      • #12
                        bad thing.
                        the contractor just replaced the subfloor. the Tile guy just laid all new tiles.
                        the cabinet folks just installed a new island cabinet.
                        that's how I noticed it.
                        the end of the island is about 3/8ths of an inch off the floor.
                        out of three different contractors no one said a word about the floor.
                        now the general contractor and I are gonna have a go round.

                        Comment


                        • #13
                          If it is heaving only in the center or around this post one might conclude that the foundation was not properly compacted with suitable fill. The soil mixture foundation along the perimeter is dry and the soil/clay around the post is absorbing water somehow. Perhaps a plumbing leak.The water swells the foundation in the area of the post.
                          I would be careful in using any ceramic tiling anywhere as this house has some movement might result in cracking/separation and you will have a hard time blaming the contractor.Stay away from ceramic or make sure they use a substrate designed to flex ..
                          You might drill some holes in the base floor and check for moisture content around the house and center, and follow the plumbing as built plans for any possible leaks.if you have metered water, shut off all fixtures and do not use any water for a day. Record meter before and then 24 hrs later and see if there is any usage.

                          Comment


                          • #14
                            Not sure how they install the pilings where Rod is located, but here they drill deep holes /and/or drive the pilings into the ground to a certain resistance so not sure he has a problem with foundation not being compacted properly.

                            And since the house is up on pilings I do not think there is a plumbing leak under /round the pilings as they do not put the plumbing there. But I could be wrong.
                            I love that disclaimer

                            Rodbolt if you do not mind, can you clear your PM folder?
                            I need to send you one

                            dang it we have strayed way off on this thread, sorry
                            Last edited by 99yam40; 06-03-2015, 06:55 PM.

                            Comment


                            • #15
                              I think he mentioned something about concrete slab which I may have assumed house on slab, but if it were on pilings they would go to rock or a measured resistance .That would be extremely rare for one to go up as its already under water.

                              Comment

                              Working...
                              X